6. 6-logout
1-Profile.tsx
1-1-UI요소 추가
1-1-1-프로필 이미지가 없을 경우 사용자명 렌더링하기
- next-with-supabase\components\Profile.tsx
- Image 컴포넌트를 수정한다
**...
**</Link>
) : (**
****<>
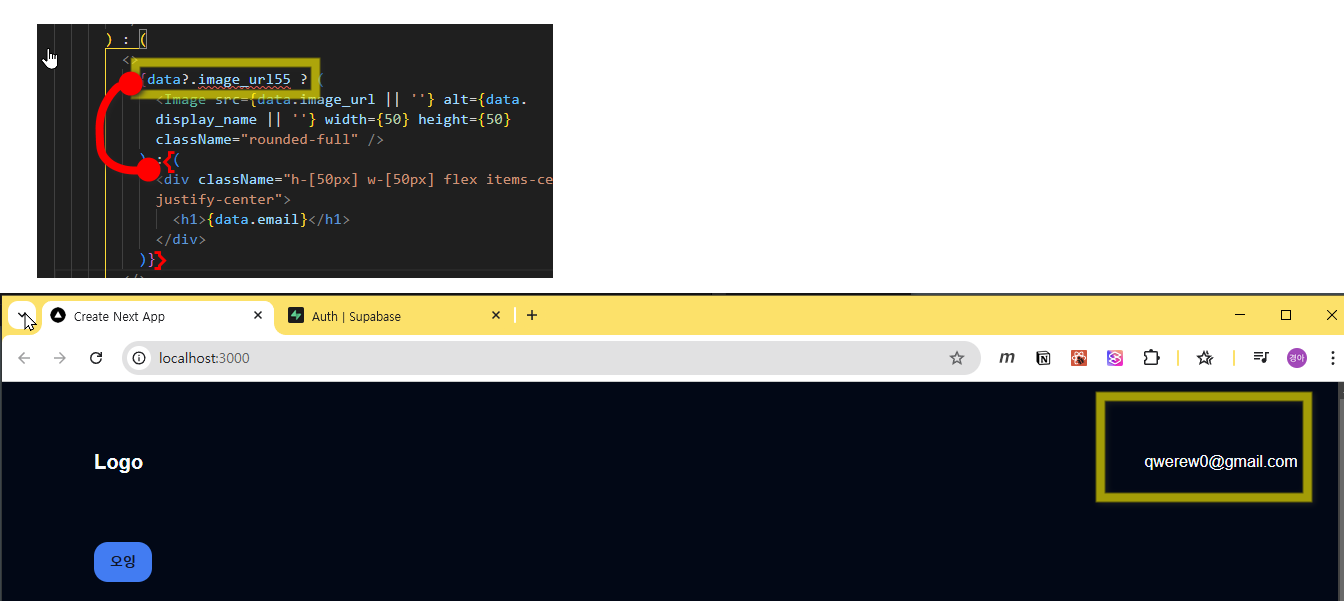
{data?.image_url ? (
<Image src={data.image_url || ''} alt={data.display_name || ''} width={50} height={50} className="rounded-full" />
) : (
<div className="h-[50px] w-[50px] flex items-center justify-center">
<h1>{data.email}</h1>
</div>
)}
</>****
...**
- 테스트 1. 이미지 데이터가 null이면 email 이 렌더링된다.
2-Logout
2-1-Logout버튼만들기
2-1-1-components\Profile.tsx
- createClient함수 임포트 handleLogout 작성
import { createClient } from "@/lib/supabase/client";
...
  const handleLogout = () => {
    const supabase = createClient();
  };
- useQueryClient
"use client";
import React from "react";
import { Button } from "./ui/button";
import Link from "next/link";
import useUser from "@/app/hook/useUser";
import Image from "next/image";
import { createClient } from "@/lib/supabase/client";
import { useQueryClient } from "@tanstack/react-query";

const Profile = () => {
  const { isFetching, data } = useUser();
  const queryClient = useQueryClient();
  if (isFetching) {
    return <></>;
  }
 const handleLogout = async () => {
    const supabase = createClient();
    queryClient.clear();
    await supabase.auth.signOut();
  };
  return (
    <div>
      {!data?.id ? (
        <Link href="/auth">
          <Button variant="outline">SignIn</Button>
        </Link>
      ) : (
        <>
          {data?.image_url ? (
            <div className="flex flex-col justify-center items-center">
              <Image src={data.image_url || ""} alt={data.display_name || ""} width={50} height={50} className="rounded-full" />
              {data.display_name}
            </div>
          ) : (
            <div className="h-[50px] w-[50px] flex items-center justify-center">
              <h1>{data.email}</h1>
            </div>
          )}
        </>
        // 1:35
      )}
    </div>
  );
};
export default Profile;
- router
import { useRouter } from "next/navigation";
const Profile = () => {
...
  const router = useRouter();
...
}
  const handleLogout = async () => {
  ...
   router.refresh();
}
2-미들웨어 작성
Info: 💡 미들웨어는 서버와 클라이언트 사이에서 로그인 정보를 안전하게 관리하는 중개자 역할을 한다.
🔹 클라이언트(사용자)가 페이지에 접근하면 → middleware.ts가 먼저 요청을 가로채서 로그인 상태를 확인
🔹 로그인되어 있으면 → 그냥 원래 가려던 페이지로 이동!
🔹 로그인 안 되어 있으면 → /login 페이지로 강제 이동!
🔹 세션 정보를 유지하면서 쿠키도 관리해서, 사용자가 로그아웃되거나 세션이 만료되면 다시 로그인하게 유도한다.
즉, "이 사용자가 로그인된 상태인지 확인하고, 필요한 경우 로그인 페이지로 보내는 보안 게이트" 같은 역할을 한다.
1.
<div className="flex flex-col justify-center items-center">
              <Image src={data.image_url || ""} alt={data.display_name || ""} width={50} height={50} className="rounded-full** cursor-pointer" onClick={handleLogout}/**>
              {data.display_name}
            </div>
- api docs 참조 https://supabase.com/docs/guides/auth/server-side/nextjs 4단계의 middleware Hook을 생성한다
- middleware.ts 파일생성
import { type NextRequest } from 'next/server'
import { updateSession } from '@/utils/supabase/middleware'

export async function middleware(request: NextRequest) {
  return await updateSession(request)
}

export const config = {
  matcher: [
    /*
     * Match all request paths except for the ones starting with:
     * - _next/static (static files)
     * - _next/image (image optimization files)
     * - favicon.ico (favicon file)
     * Feel free to modify this pattern to include more paths.
     */
    '/((?!_next/static|_next/image|favicon.ico|.*\\.(?:svg|png|jpg|jpeg|gif|webp)$).*)',
  ],
}
- utils/supabase/ middleware.ts 파일생성 후 코드 복붙
import { createServerClient } from '@supabase/ssr'
import { NextResponse, type NextRequest } from 'next/server'

export async function updateSession(request: NextRequest) {
  let supabaseResponse = NextResponse.next({
    request,
  })

  const supabase = createServerClient(
    process.env.NEXT_PUBLIC_SUPABASE_URL!,
    process.env.NEXT_PUBLIC_SUPABASE_ANON_KEY!,
    {
      cookies: {
        getAll() {
          return request.cookies.getAll()
        },
        setAll(cookiesToSet) {
          cookiesToSet.forEach(({ name, value, options }) => request.cookies.set(name, value))
          supabaseResponse = NextResponse.next({
            request,
          })
          cookiesToSet.forEach(({ name, value, options }) =>
            supabaseResponse.cookies.set(name, value, options)
          )
        },
      },
    }
  )

  // Do not run code between createServerClient and
  // supabase.auth.getUser(). A simple mistake could make it very hard to debug
  // issues with users being randomly logged out.

  // IMPORTANT: DO NOT REMOVE auth.getUser()

  const {
    data: { user },
  } = await supabase.auth.getUser()

  if (
    !user &&
    !request.nextUrl.pathname.startsWith('/login') &&
    !request.nextUrl.pathname.startsWith('/auth')
  ) {
    // no user, potentially respond by redirecting the user to the login page
    const url = request.nextUrl.clone()
    url.pathname = '/login'
    return NextResponse.redirect(url)
  }

  // IMPORTANT: You *must* return the supabaseResponse object as it is.
  // If you're creating a new response object with NextResponse.next() make sure to:
  // 1. Pass the request in it, like so:
  //    const myNewResponse = NextResponse.next({ request })
  // 2. Copy over the cookies, like so:
  //    myNewResponse.cookies.setAll(supabaseResponse.cookies.getAll())
  // 3. Change the myNewResponse object to fit your needs, but avoid changing
  //    the cookies!
  // 4. Finally:
  //    return myNewResponse
  // If this is not done, you may be causing the browser and server to go out
  // of sync and terminate the user's session prematurely!

  return supabaseResponse
}
- ./middleware.ts 수정
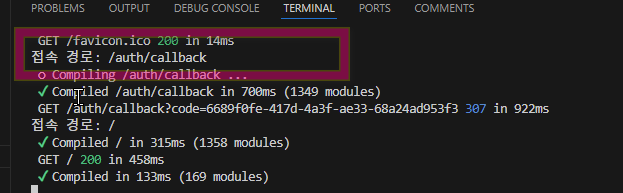
export async function middleware(request: NextRequest) {
  const url = new URL(request.url);
  console.log("접속 경로:", url.pathname);
  ...
콘솔에 pathname이 확인된다
- Supabase 서버 클라이언트 생성

createServerClient()는 Supabase의 클라이언트 라이브러리에서 서버 측 클라이언트를 생성하는 함수입니다. 이 함수는 Supabase 프로젝트와의 연결을 설정하고, 데이터베이스와의 상호작용을 가능하게 합니다. 일반적으로 이 함수는 서버 환경에서 사용되며, 인증된 요청을 처리할 수 있도록 설정됩니다.
supabaseUrl: Supabase 프로젝트의 URL입니다.supabaseKey: 인증을 위한 키로, 서비스 역할 키 또는 익명 키를 사용할 수 있습니다.createServerClient()를 호출하면 Supabase 클라이언트 인스턴스가 생성되어 데이터베이스와의 상호작용을 수행할 수 있습니다. 이 클라이언트를 사용하여 데이터베이스 쿼리, 인증, 스토리지 작업 등을 수행할 수 있습니다.
import { createServerClient, type CookieOptions } from "@supabase/ssr";
import { NextResponse, type NextRequest } from "next/server";
import { protectedPaths } from "./lib/constant";
export async function middleware(request: NextRequest) {
let response = NextResponse.next({
request: {
headers: request.headers,
},
});
const supabase = createServerClient(process.env.NEXT_PUBLIC_SUPABASE_URL!, process.env.NEXT_PUBLIC_SUPABASE_ANON_KEY!, {
cookies: {
get(name: string) {
return request.cookies.get(name)?.value;
},
set(name: string, value: string, options: CookieOptions) {
request.cookies.set({
name,
value,
...options,
});
response = NextResponse.next({
request: {
headers: request.headers,
},
});
response.cookies.set({
name,
value,
...options,
});
},
remove(name: string, options: CookieOptions) {
request.cookies.set({
name,
value: "",
...options,
});
response = NextResponse.next({
request: {
headers: request.headers,
},
});
response.cookies.set({
name,
value: "",
...options,
});
},
},
});
const { data } = await supabase.auth.getSession();
const url = new URL(request.url);
if (data.session) {
if (url.pathname === "/auth") {
return NextResponse.redirect(new URL("/", request.url));
}
return response;
} else {
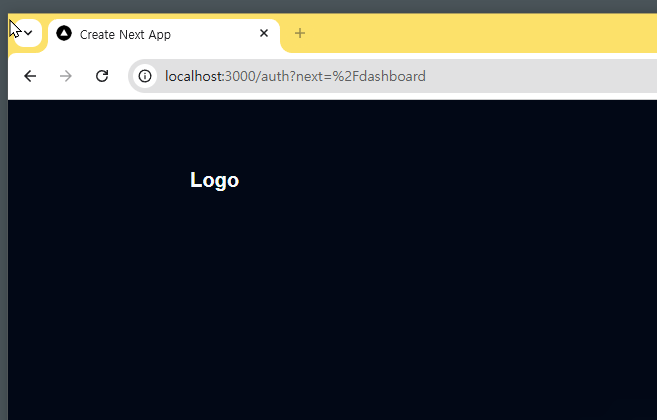
if (protectedPaths.includes(url.pathname)) {
return NextResponse.redirect(new URL("/auth?next=" + url.pathname, request.url));
}
return response;
}
}
export const config = {
matcher: [
/*
* Match all request paths except for the ones starting with:
* - _next/static (static files)
* - _next/image (image optimization files)
* - favicon.ico (favicon file)
* Feel free to modify this pattern to include more paths.
*/
"/((?!_next/static|_next/image|favicon.ico).*)",
],
};
2-1-constant 설정
- next-with-supabase\lib\constant\index.ts 파일생성
export const protectedPaths = ["/dashboard", "/profile"];
- dashboard 와 profile 이동시 아래와 같이 라우팅 된다.
3-Profile수정
- handleLogout 함수에 router 추가
...
import { **usePathname**, useRouter } from "next/navigation";
**import { protectedPaths } from "@/lib/constant";**
...
const Profile = () => {
...
**  const pathname = usePathname();**
  const handleLogout = async () => {
...
    router.refresh();
**    if (protectedPaths.includes(pathname)) {
      router.replace(`/auth?next=${pathname}`);
    }**
  };